We all know that winter is about snowsports: skiing, snowshoeing, skating, hot chocolate (oops, that’s not a sport). But…there are times that those things won’t work for you. You can’t get to the mountain, that miserable January rain came and ruined the snow . . . whatever. And, no matter how much you work out at the snowsports, if you don’t cycle over the winter, your early season rides will be slow and painful. Obviously, you can ride your bike on a trainer or rollers inside…but let’s face it, that’s about as exciting as watching paint dry, and doesn’t smell as good. Here’s some tips on how to ride outdoors safely in the winter, and actually enjoy it!
1. Assess the conditions. If there’s been snow recently, be cautious, as there may be slippery spots. If the snowbanks are pushing out into the road, don’t ride. Cars can’t see you as they try to pull out, and you’re at extreme risk. If there’s ice on the road, don’t ride, even with studded tires…yes, they help, but you still have limited traction, and a lot of cars don’t have good tires; even if you can stop, they can’t, and you lose. If there’s a lot of sand on the road…well, you can ride, but be EXTREMELY cautious in braking and turning.
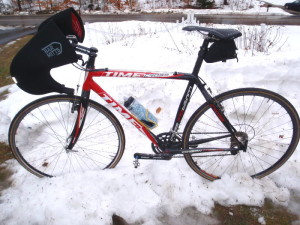
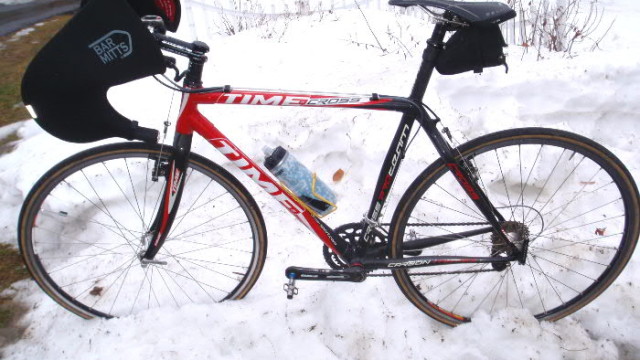
2. Prepare your bike. It’s really easy, when days are short, to suddenly find yourself riding at dusk. Make sure you have a white light on the front, a red flashing light on the rear. Remember, it’s not about you being able to see, it’s about them being able to see you! Make sure you have tires with good tread, and ideally a Kevlar belted tire or something else that resists flats. Changing tires on the road in the winter just plain stinks, and there’s more dirt, gravel, glass, or whatever, on the road to create a flat. Winter riding isn’t about speed, it’s about reminding your muscles what they’re supposed to do, so a heavy tire isn’t a problem. Carry a good tool kit; again, it’s worth a little more weight to have what you need. Also, decide what pedals/shoes you want to use. In the winter, I put my road shoes away and just use MTB. First, there are more options for winter boots (see below), but more important, if I have to get off the bike and walk, I’ve got a lot more traction. And the heavier shoes, like the heavier tires, make me feel SO fast when I get to spring and put all the lightweight stuff back on! I personally like the Crank Brothers Eggbeaters,, as they don’t get clogged with ice and snow, but all modern MTB pedal systems will work well.

3. Prepare your body. Wearing appropriate Winter Cycling Clothes makes the difference between being miserable and having fun. Even though it’s cold, you WILL sweat, so having layers that can breathe is important. Make sure your base layer wicks. Wear less than you think you’ll need, as long as what you have blocks wind well. A base layer without a zipper is fine, but anything else needs one…you want to be able to keep yourself cool enough to not get drenched with sweat (which will make you VERY cool later on). Unless it’s extremely cold (below 20 degrees F), a single layer of thermafleece tights over your cycling shorts will be enough. If it’s windy enough that you think that might affect temperatures…don’t go out, as that means it’s windy enough to blow you around! The real trouble spots are head, hands, and feet. Depending on the temperature, there are three options for your head. First is a headband that covers your ears. Ideally, figure out where you’d like the temple pieces of your glasses to go through, and cut a little hole there on each side…it’ll make everything a lot more comfortable, and the glasses will stay where they should. Second, a “touque”, or beanie…a thin, form-fitting hat, which will keep you warm at temperatures down into the mid-20s, in my experience. Some of the cross country skiing companies, like Craft, make a good product…or standard bikewear companies like Pearlizumi will have what you need. If it gets colder, a thin balaclava is the best solution; it covers your head, neck, and lower face, and you can pull the lower part up or down depending on how cold you are. Pearlizumi makes a good one, or if your budget is tight, Campmor has a polypropylene model for cheap money. Hands are another real problem spot for a couple of reasons. They don’t move much, so it’s hard to keep the circulation going in them, and mittens are difficult to use because you need to be able to shift. Throwaway handwarmers can be a big help, and they’re cheap these days; in bulk, a pair is often under $1, which isn’t much to make your ride comfortable. Lobster Gloves
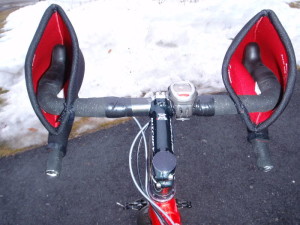
split the difference between gloves and mittens; two fingers in each “big finger” help keep warmth in, but still allow a lot more dexterity than mittens. Recently, I ran across something called Bar Mitts
, which are one of the goofier looking things I’ve ever seen. So, of course I had to try them out. I’ve gotten laughed at a couple of times…but these things work. They’re made of thick neoprene…waterproof and windproof. This is the stuff you can’t put on your hands, as it would make it hard to shift, but these go over the bars and shifters. You slide your hands with gloves on inside them, and they block wind, rain, spray from the road. It took me a little while to get used to them; you have to play around with them to make them work with your riding style. But, it’s worth the effort…you’ll ride MUCH warmer with them on! Unfortunately, the good people at Bar Mitts don’t make anything for your feet, and that’s the biggest trouble spot, particularly for me. A lot of people use neoprene booties at all temperatures very effectively. You can add to the warmth by sticking one of those disposable handwarmers in on top of your toes before you zip them up; if they won’t stay in place, use a rubber band to hold them where you want them while you put your booties on. One weakness to those booties, though, is if it’s wet out; they leave a big hole around your cleat for water to get up into. If you’re planning on riding a lot in the winter, think about splurging on a pair of winter cycling shoes
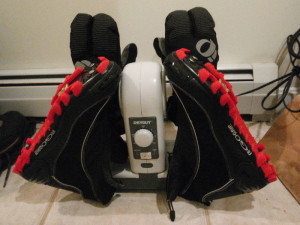
; I find they work better for me than booties. They’re made by several manufacturers; Louis Garneau, Lake, and Pearlizumi have excellent options. Think at least a half size large; your thin summer cycling socks are NOT what you want to wear. A good midweight wool sock from someone like Darn Tough or Smartwool strikes the perfect balance between warmth and the kind of fit you need for efficient cycling. And in any shoe, Thermofeet from The DryGuy will add to the warmth by reflecting your foot’s natural heat back up rather than letting it escape through the sole, where the wind is whistling by; plus, they’ll keep water away from your foot, to some extent.

Speaking of The DryGuy, one of the other problems you’ll face, particularly if you ride on consecutive days, is getting your riding clothes dry. Specifically, boots and gloves are a real issue. Here’s why: waterproof breathable barriers. Yes, those miracle products that keep us dry inside and let the sweat out are almost impossible to dry. If you just let them sit on the counter, the water droplets are too large to go out through the pores in the membrane, with the result that you put on a damp, stinky glove. And if you put them in the dryer, the heat from the outside will hold the water INSIDE the glove…and boots are even harder. Solution: a boot/glove dryer. There are a number of companies that make them…probably the two that are most prominent are Peet and DryGuy. These dryers blow warm, dry air through your boots and gloves, replicating the natural flow of having your body inside, without the moisture. My personal favorite is the DG-1 Widebody, which is surprisingly compact, yet allows me to dry my boots, gloves and even my hat! With a built-in timer, I can simply come home from my ride, throw everything on it, turn the dial, and I’m ready for the next day…or even a second ride the same day, if the opportunity arises.
Eyewear: You definitely want good eye protection, given all of the crud on the roads. I like photochromic lenses, as with the low sun angle you can go from near dark to blinding glare very quickly, and having lenses that change strikes a good balance for me. This winter, I’m using the Ryders Treviso glasses; they fit the bill perfectly. Whatever you use, make sure that the lower edge of the lens or frame comes close to your cheekbone to block the crud that sprays up from the road.
Water bottles: Subfreezing temperatures and water don’t mix. It’s really irritating when you’re an hour or so out, pick up your bottle, and everything’s frozen solid. There are a few solutions, though. First, put warm water in your bottle…it’ll take longer to freeze. Second, don’t use plain water; solutions with sugar and electrolytes, salt in particular, freeze at a lower temperature. Third, if you can, turn your water bottle upside down in the cage; that keeps the valve from freezing up as quickly. Fourth, use an insulated cycling water bottle. Originally designed to keep your water cool on hot summer days, Camelback’s Podium Chill works just as well the other way. With my warm sports drink inside, it’s a long time before it freezes up.
There’s something exciting about being out on the roads on my bicycle in February, having people stare at me as they drive by like I’m nuts, while I’m comfortable, warm, and happy. And there’s NOTHING like a coffee shop ride in the winter; pulling into your favorite place when it’s 20 degrees will get you a whole new level of respect from your barista. And just think of the reactions when you pull away from your friends on that first April group ride! Embrace this particular challenge, and you’ll extend your cycling fun ‘year round.


I am an avid bicycle rider, who usually limits his riding to the spring, summer, and fall. I would like to give winter riding a go, as the time I spend on my stationary bicycle gets very old, very fast. Can you recommend the most cost-efficient method of transporting my bicycle to my favorite bike trails? I worry that my trunk bike rack would do considerable damage to my car, given the heavy use of road salt in my area.
Ray-
Thanks for the question! I concur…I wouldn’t use a trunk rack in the winter…great way to scratch up your trunk lid. I use a roof rack; Thule, Yakima, Inno, and others make fine products. Another solution is to take off the wheels and put the bike in the trunk. There are wheel bags available from a variety of sources if you don’t want them bouncing around; Mavic makes a good one (you need a pair, unless you have a big enough trunk to leave the rear wheel on. Link: http://www.excelsports.com/new.asp?page=8&description=Wheel+Bag&vendorCode=MAVIC&major=1&minor=38. Also, on your bicycle itself, the one thing that will mess up your trunk or backseat is the drivetrain. Covers are available for that; a quick search found this one. http://www.wcfanshop.com/servlet/the-109/bike-chain-cover-for/Detail . I don’t know the company so can’t comment on the quality, but it’s an idea! We’ll be working on an article on roof racks and accessories; readers, if you have any good or bad experiences that we should know about, email us with the “Contact Us” link!